![Error handling in LabVIEW [2:4]](https://gpower.io/wp-content/uploads/2026/06/Fejlhaantering-i-labview-jesper-kjaer-soerensen-gpower.webp)
This post [2:4] is part of a series by GPower's software developer, Jesper Kjær Sørensen, on building robust software and test systems.
Do you know the feeling...?
“But it worked on my machine!” That’s the mantra of every programmer who hasn’t mastered error handling. Of course, you would never say that 😊. But perhaps you have a colleague who does—and after reading this article, you might consider sending it to them.
As I mentioned in my last article, it is important that you identify which errors can occur in your code. In this article, you will get tips and tricks for:
- Handling errors and communicating to future developers (and perhaps yourself... 😊)
- Ways to repeat a process that fails
- Better programming techniques for error handling
Handling all errors from a function
Error handling is a fundamental part of programming. If you, as the developer, choose to suppress errors from a function, it is important that you communicate this to the next person who will be working with the code. That could be you in six months.
At GPower, we have solved this by creating our own library to handle and improve exactly this communication. I will spare you the details of all our new functions, and instead simply highlight what we do when we specifically suppress errors from a function in the code.
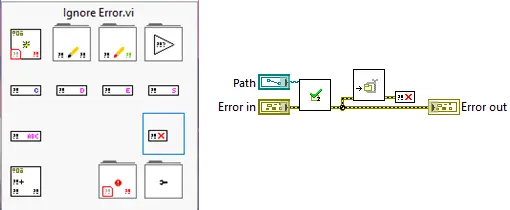
1: Ignore Error: When you want to ignore an error
Our “Ignore Error” function is designed to show that the programmer has decided that errors from this function are ignored. It may seem silly to a dedicated software developer like yourself, and you may be thinking that you can simply leave the error wire from this function unconnected, and you will get the same result.
That is partly true, but this communicates directly to the reader that it is a deliberate action. In addition, an advantage is that you can use standard LabVIEW search functions to search for all the places where errors are deliberately ignored. Likewise, “Ignore Error” gives the reader a visual cue that these errors are being ignored on purpose, and not just because the developer was busy and forgot to wire them. Another advantage is that if you use VI Analyzer, it can be used to suppress warnings about errors that are not handled (Figure 1).
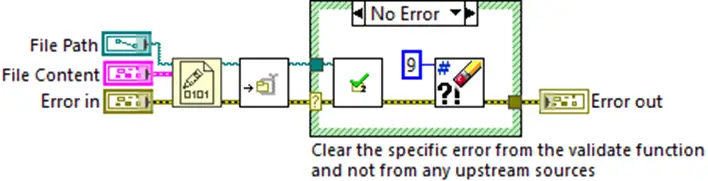
There is a difference between trying to suppress all errors from a function and focusing on a specific error with a given error code. This is where you, as a developer, need to be careful: The function you develop can only be held accountable for the error codes it can generate. Therefore, it is important that you do not remove any error you have received as input via the “Error In” control. In the example below in Figure 2, you can see that only the error from the validation function is removed, whereas all other external errors with code 9 are reported onwards (Figure 2).
2: Repeating the failing action
Sometimes it can be practical to repeat what fails—for example when you are dealing with hardware or networks. Something may have happened out in the “real world” that the code is not aware of. It could be that the network has been restarted by IT, or that the server is busy handling another request. In cases like these, it can be a good idea to build in a retry strategy, and it is easy in LabVIEW! Here are two examples of strategies:
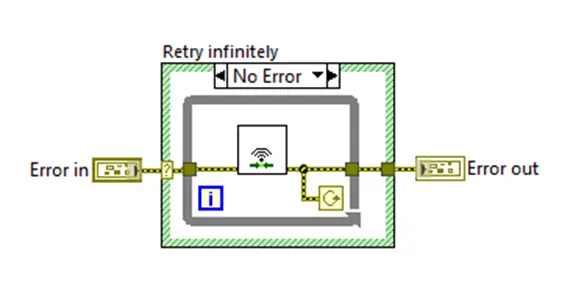
The example above (Figure 3) tries to establish a network connection and keeps trying to connect as long as it fails. As a developer, you must also be mindful to build in handling for shutting down the program—e.g., by removing errors during shutdown—so that the program can close if the user wants it to. This can be addressed with the other strategy: having a limited number of connection attempts, as shown in the figure below (Figure 4):
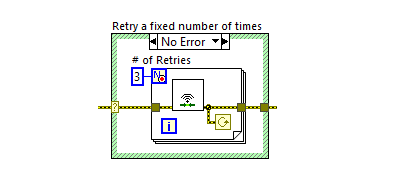
By limiting the number of attempts, the program will try to connect three times and then wait for user interaction. This can be a more user-friendly scenario, where the user is then asked to start the operation again to take three new attempts.
Note here that in both strategies, shift registers have deliberately not been used to store the error from the previous run, as that would break the entire functionality of the retry function. In addition, a case structure is used here to shield against external errors, which would also break the retry function. There are many more methods for implementing a retry function here.
3: Programming techniques for error handling
In the example of repeating the failing process, I used a case structure to shield against external errors. That made sense in this specific example, but in most LabVIEW primitives and functions, what in English is called “Standard Error Behavior” is used. This can roughly be translated as normal error behavior. As an example: If there is an external error on the error wire into a function or primitive, it does not perform its action, but simply lets the error pass through. This can be seen as the general behavior in the event of an error.

Many LabVIEW developers implement a case structure in all their VIs, as can be seen in Figure 5 in the left diagram above. This method is not recommended, as it prevents the compiler from optimizing the code. The code should run 99.9% of its lifetime in the state where there is no error, and it is built from functions that already implement the desired behavior.
Therefore, you should write the code as in the diagram above on the right. To be fair, there are also some functions and primitives that perform their function despite errors, e.g., the “Close Reference” function. For these, the error wire is used to synchronize when the function is executed. It is most often stated in the documentation for the individual function how it behaves in the event of an error.
4: Avoid using Warnings—they are just noise
The next example I want to highlight is from the NI Modbus TCP driver, where almost all errors are downgraded to warnings. The downgrade is done to ensure that very few errors can stop the driver from continuing to run. In Figure 6, I have modified the code so you can see all states of the case structure at the same time.
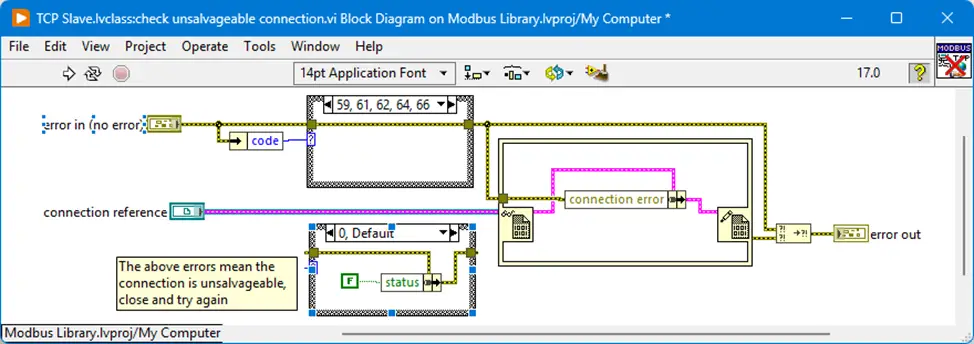
In Figure 6 above, you can see that the case structure only lets through the error numbers that occur when the connection cannot be maintained, while all other error numbers are downgraded to a warning. Since this VI is part of a state machine that stops if an error occurs, the programmer has assessed that it was necessary to downgrade all other errors.
The side effect is simply that all warnings, without filtering, are reported to the user due to the use of “Connection Reference”. It is therefore up to the user to handle these themselves. For example, it may take too long before the TCP client writes to the TCP server, and therefore the driver responds with error 56 “Connection Timeout”, which is downgraded to warning 56 “Connection Timeout”. In this way, it is up to the person implementing the driver to handle whether it has any impact on the given application.
A concluding remark
This article has covered many topics within error handling, and I hope you have been inspired to use some of it in your own work. The idea behind the article is precisely to demystify error handling—to make it easier to identify what you can do, and what you, in my opinion, should do during the development process. There are no fixed rules within error handling, but the tools and techniques described have certainly been worth their weight in gold for me.
The next article will be about GPower’s concept of Custom Errors, and why we think it is a good idea.

If you want to keep your night’s sleep and save money, it is time to get started with error handling.
– LabVIEW Champion, Jesper Kjær Sørensen, GPower